ShShMob16 Datasec Handbook
This handbook is based on “Information Security for Journalists” from the Logan Handbook Series Commissioned by the Centre for Investigative Journalism. Authors: Arjen Kamphuis & Silkie Carlo, shortened by Katrin Rönicke & Marie Gutbub for the ShShMob16 workshop organized by the Bundeszentrale für politische Bildung and n-ost in Odessa. Creative Commons Licence. (CC BY-NC- SA 4.0)
The original handbook can be downloaded here: http://tcij.org/resources/handbooks/infosec/
Be careful! This handbook is now several years old and many sections may be severely outdated. Please have a look at more recent tutorials, for example infosecbytes.org – you can also get in touch with me here.
Disclaimer
Since attack technologies are always changing and much of their use
is entirely secret, we rarely confidently know the exact threats; when,
where and to whom they apply; or the efficacy of our defences.
Therefore, it is down to you to perform a personal risk assessment and
design an appropriate defensive response during the course of reading
this book.
You may also want to factor in practicalities: some users may compromise
their InfoSec, whilst aware of the risks, to meet other practical
demands in their work, whereas some users practise sophisticated InfoSec
above their perceived need because they find it practically doable.
Some basic questions you may wish to ask yourself when threat modelling for your InfoSec strategies are:
- 1. Who could your adversaries or potential attackers be?
- 2. What tools might your potential attackers possess?
- 3. How likely is your potential attacker to use their available tools against you?
- 4. What risks could arise, for you and those you communicate/work with, from a targeted attack?
- 5. What risks arise from passive surveillance? How extensive are the tools used in passive surveillance?
- 6. What defence strategies are practical, safe, and effective in light of your evaluated risks?
- 7. What defence strategies are practical, safe, effective, and instructible for my sources and colleagues, in light of their evaluated risks and/or the risks incurred by our communication?
The threats will change, with time, but so too will the technologies available to protect journalists and citizens. So, it is important to understand InfoSec in theory, and to always continue learning about InfoSec in practice.
Your security and/or encryption methods will only be effective if
each level of your system is secure. You can send your emails with
unbreakable encryption, or use the strongest conceivable passwords, but
if your system is hacked, or otherwise vulnerable, your efforts may be
futile, as your encryption can be circumvented without any need to break
it.
Depending on your risk level and the sophistication of your adversary,
protection strategies range from simply keeping your laptop or phone on
you at all times, to using a second-hand, cash-bought, laptop and
practising robust InfoSec, during a specific project.
Despite the fact that the pervasive surveillance of law-abiding
citizens almost certainly contravenes international human rights laws,
use of certain privacy tools can be illegal.
Several of the privacy tools discussed in this handbook are
cryptographic tools. This cryptography may be illegal, or require a
license, in several countries including China, Cuba, Iran, Libya,
Malaysia, North Korea, Singapore, Sudan, and Syria.
When entering some of these countries, you may need to declare any
encryption technology on your laptop. You should consider the legal
implications of using cryptography and makeinformed decisions about
where and when it is safe for you to do so.
You can find out more about cryptography laws for each country here: http://www.cryptolaw.org/
Chapter 1: Safe Browsing
A web browser is the software you use to access the World Wide Web. For many of us, web browsing is ‘The Internet’, and in many senses it is a window to the world.
| Web browsing risks: Data collection of your identity Data collection of your browsing behaviours, including the pages you have visited, and when Data collection of your passwords and autofill information Data collection of your location (and previous locations) Malware (malicious software, sometimes spyware) injections Being blocked from accessing certain sites Being blocked from using anonymous browsers InfoSec action: Use a general purpose browser, with privacy-enhancing extensions, for daily activities Use the Tor browser for anonymous browsing, for censorship resistance, and to hide your real location |
Firefox
A popular open source web-browser
For Windows, download Firefox for your operating system and language at www.getfirefox.com.
On Linux distributions, Firefox should already be installed.
Extensions
A general-purpose browser is certain to make your identity, location
and activity available. However, there are some extensions we can use to
increase our privacy and security somewhat.
You can install these extensions directly in your browser: click on the menu, then Add-ons > Get Add-ons and use the search bar to find the extensions.
We particularly recommend the following open source extensions:
- HTTPS Everywhere: forces encryption for all connections between your web browser and the webserver you are visiting.
https://www.eff.org/https-everywhere - uBlock: block ads, trackers and malware sites – if you happened to use AdBlock Plus, we recommend replacing it with uBlock
https://github.com/gorhill/uBlock - Privacy Badger: blocks spying ads and invisible trackers.
https://www.eff.org/privacybadger - Self-Destructing Cookies: gets rid of a site’s cookies and LocalStorage as soon as you close its tabs, protects against trackers and zombie-cookies. https://addons.mozilla.org/en-US/firefox/addon/self-destructing-cookies/?src=api
- NoScript: blocks JavaScript. JavaScript is an essential
element of many websites, but can be exploited to track your browsing
behaviour, leak your passwords, and to inject malware. NoScript is very
effective but you will need to grant or deny privileges on a per website
basis depending on how much you trust them.
https://noscript.net/
Tor
About Tor
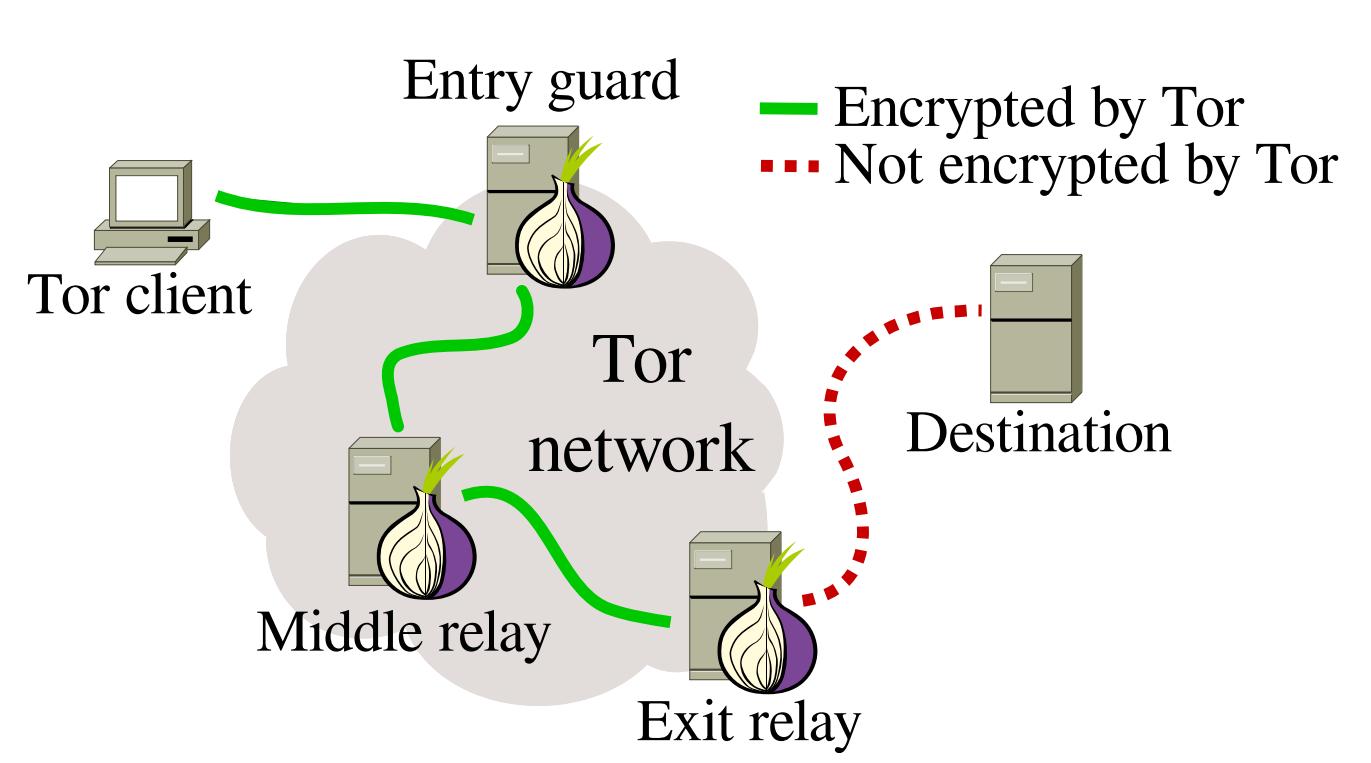
The Tor browser was especially designed for anonymity by routing all its traffic through the Tor network. Therefore, this browser prevents internet providers storing accurate information about your web browsing history.
The Tor network is a global network of computers called Tor nodes that have encrypted connections with each other. When the Tor browser starts, it will connect to one of these nodes. This node will connect to a second node that will in turn connect to a third node. These nodes could be anywhere in the world, and the first and third node will not be aware of each other. The third node will connect to the wider internet and fetch webpages from the sites you’re visiting.
Those sites will not be able to see where you are or who you are (as long as you do not identify yourself by logging into services associated with your real identity).
Staying anonymous
The latest version of the Tor browser gives users a security slider
to determine their security options. In the Tor browser, click on the
green onion (to the left of the address bar) and select Privacy and Security Settings to see the slider and the various options. The slider is set to low by default, which increases usability.
To benefit from the high level of privacy that Tor can offer, or if you
need to browse anonymously, you should set the slider to the highest
level.
Do not open documents (such as .doc and .pdf) downloaded via Tor while still being online. These document formats can contain elements that independently connect to the internet, thereby revealing your real IP address. Make sure you are offline first or use a separate computer for working with such documents.
Don’t run bittorrent over Tor since this may betray your real IP address and will consume disproportionate amounts of capacity on the Tor network.
Make sure you use the latest version of the Tor browser. You will be alerted on the Tor browser homepage when updates are available, or you can click on the green onion in the browser window (to the left of the address bar) to Check for Tor Browser update.
Install Tor
Mac, Windows:
Download and install the Tor browser for your operating system at https://www.torproject.org/ following the installation instructions on the site.
Linux/Ubuntu:
Download the Tor browser for Linux at https://www.torproject.org/, and select Save file. Wait for the download to complete.
In your file directory, go to Downloads (or wherever you saved the download), right click on the Tor download, and select Extract here. Open the extracted file (e.g. tor-browser_en-US), and click Tor browser setup.
Start Tor
You now have the option whether to Connect or Configure. Unless your network provider blocks access to the Tor network (in which case, refer to our next section Bridges), select Connect.
The Tor browser should now launch. The Tor browser setup icon in your file directory should now be Tor browser – this is your Tor launch icon.
You can drag this icon to the desktop or lock it to the launch bar to make your Tor launcher easily accessible.
Bridges
If the network provider you are using (this may be the entire country or just a University network) blocks access to the Tor network, you can use ‘bridges’ to achieve access. Bridges are ‘private’ Tor relays (nodes or computer points that receive traffic on the Tor network and pass it along) that are less likely to be blocked, and thus help circumvent censorship.
1. Launch the Tor Browser.
2. Click on the green onion (to the left of the address bar) and click Tor Network Settings > tick My ISP blocks connections to the Tor network.
3. You now have a box to enter one or more bridges – strings of numbers that identify a Tor relay.
4. To get bridges, go to https://bridges.torproject.org
or if you cannot access that site, send an email to
bridges@torproject.org, from a gmail.com or yahoo.com email address,
with the line get bridges by itself in the body of the message, and bridges should be sent back to you.
Using a bridge can be an extremely slow way of connecting to the internet, but if you need it to circumvent censorship, it works very well.
Chapter 2: Passwords
Passwords are a key line of defence at all levels of information security.
However, bear in mind that passwords to online accounts are mainly a
defence against non-state hackers (who are also able to obtain
increasingly sophisticated commercial password cracking programs). There
may be backdoor access at a state level to your online accounts,
ultimately rendering a password irrelevant.
So, whilst strong passwords are always a good idea, passwords that
protect your system (e.g. hard disk encryption) and your encryption
programs are far more important than passwords to online accounts.
|
Risks:
Forgetting and losing passwords
Overriding passwords by backdoor access (online accounts)
Hacking (relatively unsophisticated password hacking)
Password cracking (sophisticated)
Key logger
Being coerced into revealing a password
InfoSec action:
Learn how to create strong passwords
Use KeePassX password manager (if you trust your system). KeePassX is an open source password manager that can generate and store usernames and passwords in an encrypted, local database, protected by your master password. Store the most important passwords in your head only |
Schneier scheme
You should use manually created passwords to encrypt your whole
system, any encrypted USB stick or highly important file (e.g. source
documents), and your password manager. These important passwords should
be stored in your human memory only, and therefore need to be memorable.
Of course, to minimalise any damage should a password be compromised, you should avoid re-using passwords.
To manually create a password, we recommend the “Schneier scheme”, a
method advocated by Bruce Schneier, the internationally renowned
cryptographer and security expert.
Schneier advises taking a memorable sentence and initialising, symbolising, and numbering the words to turn it into a password.
For example, “This little piggy went to market” might become “tlpWENT2m”.
That nine-character password won’t be in anyone’s dictionary. Choose
your own sentence, something personal, but not obviously related to you
through public data.
Here are some examples:
- WIw7,mstmsritt… = When I was seven, my sister threw my stuffed rabbit in the toilet.
- Wow…doestcst = Wow, does that couch smell terrible.
- Ltime@go-inag~faaa! = Long time ago in a galaxy not far away at all.
- uTVM,TPw55:utvm,tpwstillsecure = Until this very moment, these passwords were still secure.
(Of course, do not use any of the above examples: now that they have been used, they are invalid as strong password options).
Using KeePassX
KeePassX is a password manager that stores usernames and passwords in a local encrypted database, protected by a master password. It also comes with PWGen, a strong random password generator.
Linux/Ubuntu:
You can download KeepassX here: https://www.keepassx.org/downloads.
On Mac, follow the instructions to install. Default installation is fine.
On Windows, extract the file and then follow the instructions. Default installation is fine.
Linux/Ubuntu:
Download KeepassX directly in the software manager.
To create a new password database:
File > New database
Create a strong master password that will protect your password database.
You can then name your database file and choose the location where it will be saved.
To create a new password group:
Groups > New groups
(e.g. “email” group, for your email usernames and passwords)
To add a new password:
Click on a group > Entries > Add new entry
Here you have the option of entering a password, or generating a random one (click Gen).
If you click on the eye icon, you can see the text of the password. Otherwise, it will remain obscured.
To retrieve a password:
When you have added a password to a group, you can right click on the desired password and select copy password to clipboard. You can then paste it in to a login form.
Chapter 3: Instant Messaging
Instant messaging is a great way to start and maintain conversations with a source. It is very quick and easy to set up encrypted, ‘off-the-record’ (OTR) instant messengers (IM) – especially compared to setting up encrypted mail.
Using an OTR IM, you can discuss necessary security protocols before you continue conversing, meeting, emailing, sharing documents/information, and so on. It is also a useful tool for talking to colleagues if you are collaborating remotely on a project.
Off-the-record instant messaging allows you to have private conversations that are not only encrypted, but that are not stored, and therefore ‘deniable’. That is to say, it is plausible that a chat purportedly including a chat account associated with you, is not actually you.
OTR IM uses public keys that are used to verify a contact really is who they purport to be. However, every time you begin a new chat with a contact (who has been verified by their public key), the chat is encrypted using new, throwaway keys. Don’t worry – you don’t have to do or even see this yourself – this is under-the-bonnet encryption that the messenger client does it for you.
You can use OTR encryption for different kinds of chat protocols. We recommend using jabber.
!!!Tor-messenger is no longer maintained. Please use Pidgin for Linux/Windows and Adium for Mac. (For Windows install Pidgin and the OTR-plugin, close the programs after installation, restart Pidgin when both are installed, activate the OTR (or Off-the-record) plugin in the Tools>Plugins menu, then follow the paragraphs about configuration from the Pidgin for Linux tutorial. You can read the paragraph below if you want to learn more about how to register an account on Systemli, how to check fingerprints, etc.!!!
Install Tor-messenger
In this handbook we will explain how to use Tor-messenger, a messenging client that automatically connects over Tor.
Alternatively you could use Pidgin (Windows, Linux) or Adium (Mac).
You can find a tutorial on http://tcij.org/resources/handbooks/infosec/chapter-6-instant-messaging.
Mac, Windows:
Download and install the Tor browser for your operating system at https://trac.torproject.org/projects/tor/wiki/doc/TorMessenger#Downloads following the installation instructions on the site.
Linux/Ubuntu:
Download the Tor browser for Linux at https://trac.torproject.org/projects/tor/wiki/doc/TorMessenger#Downloads, and select Save file. Wait for the download to complete.
In your file directory, go to Downloads (or wherever you saved the download), right click on the Tor download, and select Extract here. Open the extracted file, and click Tor messenger setup.
Start Tor-messanger
You now have the option whether to Connect or Configure. Unless your network provider blocks access to the Tor network (in which case, refer to our next section Bridges), select Connect.
The Tor browser should now launch. The Tor browser setup icon in your file directory should now be Tor browser – this is your Tor launch icon.
You can drag this icon to the desktop or lock it to the launch bar to make your Tor launcher easily accessible.
Create an IM account
Like e-mail, Jabber is decetralized: you can pick an existing server of your choice or run your own.
The registration for some servers happens directly in your chat client,
for others you can or need to register an account in a browser.
You can find a list of free, public and secure Jabber servers on https://xmpp.net/directory.php. Make sure you pick a server with good security grades.
In this handbook we will user Systemli Jabber server.
To register an accout, visit https://www.systemli.org/en/service/xmpp.html.
Scroll down and click Register an account.
Enter the username of your choice and a strong password, then answer the question.
Your account is now registered; your Jabber address will look like this: username@jabber.systemli.org.
Add your account to Tor-messenger
When youo start Tor-messenger for the first time, the Account Wizard window should open automatically.
If this is not the case (or if you have used Tor-messenger before), click Tools > Accounts in the top bar; then click New Account in the Account window.
The first window allows you to select the protocol you will use. Click XMPP (the technical term for “jabber”), then click Next.
In the next window, first type the username of the account that had been
previously created. Then type the domain of your jabber address (we use
jabber.systemli.org) in the Domain bar.
Make sure the box Create this new account on the server is unchecked, as you have already created your account. Then click Next.
The next window asks you to type your password. However, adding your
password here will save it and make it easier to log in your account if
your computer is stolen. We strongly recommend to avoid this: simply
leave the password box empty, and click Next.
In the last window, you can give yourself an alias (a nickname) if you want. Then click Next, and Finish.
You can now connect to your account: in the Accounts window, click on the name of your account, then click Connect and enter your password.
Add contacts to your account
In the top bar of your Tor-messenger window, go to File > Add Contact.
You can now type in the full address of your contact in the Account line, then click OK.
By default, Tor-messenger doesn’t show your contacts when they are offline. If you want to see your full contact list (when you will have added contacts), right-click on the white background of the contact window and click Show Offline Contacts.
When your contact is next online, they will receive an authorisation request from you.
Once your contact has confirmed your request, you will recieve
notification saying that your contact wants to chat with you. Click on Allow to chat.
To chat with your contact, double-click on their address to open a conversation window.
This will work only if your contact is online too.
First chat
Before chatting, start an encrypted conversation: click on the red
padlock symbol in the upper-right corner of the conversation window,
then click on Start private conversation.
If you have not yet authentified your contact, a black banner will
appear on the top of the conversation window to invite you to verify
your contact.
To do so, click on Verify: the verification window should appear.
You can authenticate either by
- A question and answer: a good, personalised method
- A shared secret: has to be pre-arranged via a different communication method
- Manual fingerprint verification: a useful and strong method
Ideally, you will use fingerprint verification and if you know the
person well enough, you will also ask a question of each other, that
only the other person would know the answer to.
You can selet the method of your choice in the upper menu.
Checking fingerprints
You should ideally check one another’s fingerprints by a communication method other than IM (email, phone).
If the fingerprints match, confirm the verification by selecting Yes in the menu under the fingerprints, then click Verify to confirm.
If there is not a secure means by which to check fingerprints, a
mutual friend/third party on IM can pass on a partly redacted version of
your fingerprint to the contact (e.g. 0—A7-0 D—706-D 2—65–1 –3D-9C2
0-57B—1), and the contact’s fingerprint to you, for you both to check
alongside the purported fingerprint shown.
Redacting parts of your fingerprint may help prevent a “man-in-the-middle” impersonation attack.
Chatting
The padlock symbol in your conversation window should now be green: you can start chatting with your contact.
Next time you will be able to start a private, verified conversation simply by clicking ont the padlock, and then select Start private conversation.
The fingerprint for your contact will be saved.
To end a conversation, always click on the green padlock symbol and select End private conversation. Then you can close the conversation window and log out of your jabber account.
Chapter 4: Email
Email is very likely the means by which you most frequently contact colleagues and sources. Vitally, it is the means by which a new source could contact you.
Therefore, having secure email, not only for everyday use with colleagues but as a secure channel for initial contact, is important for any investigative journalist or blogger.
| The risks to your email communications include an adversary doing any of the following: Reading email content Reading subject header Seeing who you are contacting, how often and when Intercepting email attachments “Man in the middle” attacks (an impersonator intercepting communications) Seeing where you are emailing from (location) InfoSec action: Use strong passwords Use a trustworthy email provider Encrypt your email Verify your keys Put minimal information in your email subjects Email from Tails (if/when you need to) Use anonymous email addresses for select purposes |
Email provider
An email provider that is “trustworthy” is one who has a good basic security infrastructure, and who won’t hand over your data to an intelligence agency in a hurry. If you do not trust the country where the email provider is based, it is best not to use an email address there. For example, we know that the default position of the US and UK intelligence agencies is to record and store as many email communications as possible. Even if you don’t feel your email communications to be of relevance to these agencies now, they will be retroactively accessible should you and/or your work become relevant in the future. So, if you don’t trust the US approach to email privacy, be aware that the email providers based there (Outlook, Gmail, Riseup, etc….) may be subject to that approach. Some email providers are thought to be more co-operative than others, but unless you run your own server (or the organisation you work for runs their own server in a country with good privacy laws, like Switzerland or Iceland), we should assume that your emails and email metadata are not secure with any email provider. Other considerations are whether you have to hand over your mobile phone number, a postcode/address, or another of your email addresses in order to register an account with a provider, as you may want to avoid donating that information in future (and especially if/when you use an anonymous email address).
Email metadata
Metadata is data about data. Email metadata includes both the sender’s and recipient’s names, emails and IP addresses, server transfer information, date, time and time zone, unique identifier of email and related emails, content type and encoding, mail client login records with IP address, priority and categories, subject of email, status of the email, and any read receipt request.
This information is extensive and revealing alone, but many intelligence and law enforcement agencies (and in some cases, individual hackers) are also able to retrieve the full email content. You can’t easily protect the metadata of your emails, so you should be minimalistic or obsfucatory in your subject line, and you may wish to hide your real location/IP address by using the Tor browser.
Note that email encryption does not hide metadata such as who you are talking to, the email subject, or your location (though you can hide your real location by using Tor/Tails). For people at all risk levels, it is a good idea to be minimalistic or obsfucatory in your subject line.
Email encryption
You can protect the privacy of your email content by using public key cryptography. Public key cryptography scrambles the content of your email into (thus far) unbreakable code using the recipient’s public key. The encrypted email can then only be decrypted using the intended recipient’s private key.
The following instructions recommend the GNU Privacy Guard, “GPG”
(an open source implementation of Pretty Good Privacy, or PGP).
Using GPG, whilst very different to normal emailing, is not difficult
and you will get used to it very quickly. Understanding exactly how it
works, however, is slightly more challenging.
You can’t encrypt or decrypt email from your smart phone. Whilst it
is possible to set up on some Android phones, it is highly inadvisable
because mobile phones are fundamentally insecure anyway.
Neither can you encrypt or decrypt mail in your web browser (unless you
are using the Tails operating system): you will use the Thunderbird
email client on your desktop, with the added encryption software, to
encrypt and decrypt mail.
Finally, you can only send encrypted emails to other people who also use encrypted email. This used to be a rather small community of people but in a post-Snowden world, it is growing exponentially.
Key pairs
Keys are essentially unique long sets of numbers, and each user of email encryption has a key pair: a public key, and a private key.
Your public key: Your public key is what people will use to encrypt emails that they send to you.
Like listing a phone number in the phone book, you can choosewhether to
list your public key on the public keyserver or not (if it is a secret
or anonymous email account, you may not wish to upload the key to the
keyserver). If you choose to list your public key on the keyserver, it
will be openly available so that anyone can contact you securely.
Your private key: Your private key allows you to decrypt emails from others who have contacted you using your public key.
Although your public key is then freely available, the private key in the key pair is exactly that: private!
A private key corresponds to your public key, ensuring that no one else
can have unauthorised use of your public key. You will probably never
even see your private key: it lives and works under the bonnet of your
GPG software.
The length, randomness, and sophistication of strong public key
cryptography (4096 bit keys, as per our instructions below) are such
that the encryption remains, as far as we know, unbreakable.
Verifying keys
Importantly, you should always verify that the keys of the people who you send encrypted mail to really do belong to your intended recipient. Although the email address belongs to the person you want to contact, there is a small chance (at high-risk levels) that their purported public key might not. This is known as a “Man-In-The-Middle” (MITM) attack: the covert interception of communications by the impersonation of a target. You need to make sure that both the email address and the public key definitely belong to the individual concerned. See verifying keys later in this chapter.
Installation instructions for encrypted email
What you need
Linux/Ubuntu:
Thunderbird email client and GPG encryption software
Ubuntu comes pre-loaded with Thunderbird (email client) and GPG encryption software.
Use the Ubuntu search tool on the top left hand of the desktop to find it.
Mac:
Download Thunderbird email client and GPG encryption software
You will need to download:
- An email client/mail manager for your desktop: Mozilla’s open source ‘Thunderbird’
https://www.mozilla.org/en-US/thunderbird/ - GPG “Gnu Privacy Guard”, which is encryption software
https://gpgtools.org/
The first pink download box, Download GPG suite will be the latest version, click on it to download. Click on the download when complete, and follow the wizard to install.
When the downloads are complete, open Thunderbird from your Downloads and drag the Thunderbird icon into the Applications folder.
Windows:
Download Thunderbird email client and GPG encryption software
You will need to download:
- An email client/mail manager for your desktop: Mozilla’s open source ‘Thunderbird’
https://www.mozilla.org/en-US/thunderbird/
Once you have downloaded the file, click on your Thunderbird Setup download. Thunderbird will offer you a brief Setup Wizard – select the standard install, confirm the program file location, and click next to complete and finish the install. - GPG “Gnu Privacy Guard”, which is encryption software
https://www.gpg4win.org/download.html
The first green download box will be the latest version of GPG: click on it to download. Click on the download when complete, and follow the install wizard to install.
How to install
(all operating systems)
- Thunderbird
1. Open Thunderbird. If you are opening Thunderbird for the first time, it may prompt Integration – skip this, and uncheck Always perform this check when starting Thunderbird.
2. Thunderbird will now prompt you to configure your email account, and offer you a new email address. Click Skip this and use my existing email.
3. Enter the email address you would like to use for encryption and the password. You should decide whether you select Remember password or not. It may be safer if you don’t allow your laptop to remember your password, but you will then need to enter the password every time you access the account on Thunderbird.
Note: if you are using an anonymous email address, obviously, do not enter your real name!
4. Click Continue.
You should see, Configuration found in Mozilla ISP database.
5. You now have the option to choose between IMAP or POP3. Choose IMAP if you use webmail, and click Done.
Expert info: Unlike POP, IMAP offers two-way communication between your online email account and your desktop email client, so any changes you make in your email client are communicated back to your online account (e.g. if you mark an email as ‘read’ on Thunderbird, with IMAP, it will appear as ‘read’ on your webmail too). - Enigmail security extension
At the top of the Thunderbird window, click on Tools > Add-ons > Extensions. If you see Enigmail, you already have Enigmail. If not, go to the search bar in the
upper right of the window, and search for Enigmail. Click Install, and restart Thunderbird. When Thunderbird restarts, you can close the Add-ons Manager tab.
Note: if you do not have a menu bar at the top of the Thunderbird window, right-click on the 3-line menu icon on the top right hand side of the Thunderbird window and tick Menu bar. - Key pair
1. At the top of the Thunderbird window, click on Enigmail > Key Management.
2. Back up to the top toolbar, click Generate > New key pair
3. The email address you wish to use for encrypted mail should be selected
4. Tick Use generated key for the selected identity. Select key to expire in 5 years
5. Enter a passphrase (this is the passphrase for your encrypted mail, not just your online mail accountm it should be very strong!)
6. The Comment box adds a public comment to your public key if you list it on the keyserver (so don’t use this for a password hint!)
7. Under Key expiry, the key should expire in two years
8. Click the Advanced tab, and select the maximum key size of 4096, and Key type RSA
9. Click Generate key and move your mouse around the screen whilst it generates your key (this aids the “randomness pool” from which the key is configured). This may take a few minutes.
10. A box will appear informing you that the key generation is completed.
11. Click Generate Certificate in this box (this creates a revocation certificate that you will need when you wish to invalidate your key, for example, if the key pair is lost or compromised). Save the revocation certificate somewhere safe (for example on an encrypted usb stick or CD). You will now be asked to enter your passphrase in order to complete this action. - Configuring Thunderbird
Go back into Thunderbird to change some settings.
1. Expert Settings
Enigmail > Preferences > Display Expert Settings- Basic > Passphrase settings: here you should select how long you want Thunderbird to remember your key pair passphrase for
- Sending: Select Manual encryption settings and tick
– Encrypt/sign replies to encrypted/signed messages – If possible, under Automatically send encrypted – All usable keys, under To send encrypted, accept – Always, under Confirm before sending
N.B. this is a very useful tool that tells you every time you send an email whether the email is signed and encrypted, so you are much less likely to accidently send an unencrypted email - Key Selection: Tick By Per-Recipient Rules, By Email Addresses according to Key Manager, and Manually if Keys are Missing
- Advanced: we recommended that you tick Re-wrap signed HTML text before sending as HTML text does not work well with encrypted emails.
2. Saving folders locally
This is particularly useful for saving drafts: you don’t want your draft, unencrypted emails being saved on your online mail folders. Rather, you should save them locally on your hard disk to have more control over their security.
- In the menu bar on the left hand side of the Thunderbird window, you will see all your email folders. At the bottom, are Local Folders: right click and select New Folder. Creating Sent and Draft local folders may be helpful.
- Click Edit (Linux) or Tools (Mac/Windows) > Account Settings > Copies & Folders. You can select where to store your messages here. For example, under Drafts and Templates, select Local Folders as the location to keep your message drafts.
- In the same window [Edit (Linux) or Tools (Mac/Windows) > Account Settings] click OpenPGP Security tick Encrypt draft messages on saving.
HTML does not encrypt well, so you will write messages in plain text instead.
Edit (Linux) or Tools (Mac/Windows) > Account Settings > Composition & Addressing. Untick Compose messages in HTML format
4. Share your PGP signature with contacts
You should always sign encrypted messages to help the recipient verify that you are the real sender. Sharing your PGP signature with the people you email, even when the email is not encrypted, also helps the recipient (if they also use Enigmail) verify that you are the real sender of the message (not an impersonator). If the recipient does not use PGP encryption, signing unencrypted mail indicates that you usually use PGP encryption, or to the uninformed, it may be mildly confusing!
Edit (Linux) or Tools (Mac/Windows) > Account Settings > OpenPGP Security
Enable OpenPGP support (Enigmail) for this identity should be ticked.
Tick sign encrypted messages by default. If you wish, you may select Sign non-encrypted messages by default. Click OK.
Publicly list your public key
Uploading your public key to the keyserver is like listing your phone number in a phonebook. It allows people to search for your name/email address, and locate your public key in order to send you an encrypted email. This is very useful for journalists who invite encrypted mail and wish to protect source confidentiality.
However, if you are setting up encryption for an anonymous email address that you will use only to communicate with specific, high risk individuals, of course there is little to gain from uploading your public key to the keyserver.
We do not recommend uploading your first key to the server immediately after you have generated it.
In the process of learning, people often compromise their first key
pair or lose access to it. If you can afford taking some time to get
used to email encryption, consider not publishing your key during the
learning process. Instead, try to send encrypted emails (to friends,
colleagues) on a regular basis and upload your key to the keyserver
after a few weeks of practice.1. Go to Enigmail > Key management.
2. Tick Display All Keys by Default.
3. Right click your email address, and select Upload Public Keys to Keyserver if you want people to be able to contact you.
The default keyserver (pool.sks-keyservers.net) is fine.
To search for anyone’s public key
Search for a name/email address to see if a person has a public key listed, so you can send them encrypted mail (like searching for a number in a phonebook).
Enigmail > Key management > Keyserver (in the top toolbar) > Search for keys.
Enter the person’s name or email address and browse the results. Tick
the email address of anyone whose key you’d like to import and press ok.
Don’t forget to verify the fingerprint before using the key!
Import a key
If you already have your contact’s key on a file or online, but need to import it to your key manager on Thunderbird.
- Importing a key from file:
In Thunderbird, go to Enigmail > Key management.
Now go back up to the top toolbar to click on File > Import keys from file. - Importing a key from email:
If your contact has attached their public key in an email, right-click on the .asc attachment and click Import OpenPGP Key. - Importing a key from a public key block:
Many people have their full public key “block” (i.e. the full public key in text) on their website. This allows people to trust the website as the source of the key rather than the keyserver, and may help prevent man-in-the-middle attacks.
Simply copy the whole key block (the entire block, as shown highlighted in yellow below), then in Thunderbird go to Enigmail > Key management > (back up the top toolbar) Edit > Import keys from clipboard and click Import in the confirmation box.
A public key block looks like this: http://pool.sks-keyservers.net/pks/lookup?op=get&search=0x4C5980F4BB86A00A
Verifying keys
Make sure that the person you think you are communicating with is certainly who they say they are.
In Thunderbird, go to Enigmail > Key management > right-click a selected email address > Key Properties. Here you will see the person’s key fingerprint.
You can verify that the key does indeed belong to the person by
exchanging fingerprints by another communication means (ideally in
person, if not possible, on the phone, on their website), and checking
they match exactly.
In the same window you can then click Certify > select if
and how well you have checked the fingerprint. To avoid uploading this
signature by mistake on the keyservers, we recommend cheching the Local signature box. Then click OK.
In the same windows you can also click Change and select how much you trust that the key does in fact belong to the individual concerned. Then click OK.
Send an encrypted email!
When you have completed the set up, send a test email to someone else who has encrypted mail. Import their key or find it on the keyserver, and be sure to verify it and sign your trust of their key before you try to send an email.
Choose a recipient whose key you have already imported, verified, and set owner trust for. Write your email, and before you click Send, click on the padlock icon to close it and encrypt the message. Make sure the pen icon next to the padlock icon is selected too: it confirms that your message is signed. Both icons should be yellow.
Press Send, and the confirmation box should tell you that the
email is both signed and encrypted (if not, go back and check you ticked
to encrypt).
Click Send Message, and your encrypted email will be sent!
Share your public key with an individual
The first time you send a contact an encrypted email, you should attach your public key so that they can respond by encrypting an email back to your key. In the email compose window, to the right of the encryption padlock and signing pencil icons, there is an option to Attach My Public Key. Select this to attach your public key to the email. Alternatively, click Enigmail> > Attach My Public Key.
Protecting your identity and location when emailing
At higher risk levels, for those who wish to hide the real identities of themselves and/or others communicating, anonymous email accounts should be used, unassociated with any other aspect of your online identity – they should not be connected with you in any way. Gmail and Hotmail tend to request a phone or alternate email address, so these providers are not ideal for anonymous accounts. In many countries, GMX and Yandex, allow users to create accounts without such identifying information. However, if you create an anonymous email address from an internet connection that is associated with you, your anonymity may already be compromised. Furthermore, when you send and receive emails, you are doing so by connecting to the internet, thus your location is known by the internet provider (and potentially, an adversary). If you want your identity and location to be anonymous, you can use an anonymous account to send unencrypted emails through webmail on the Tor browser ; or you can use the Tails operating system, which hides the real location of all of your laptop’s communications with the internet. Tails’ desktop email client (which supports encryption) sends and receives information/mail to and from the internet through Tor, thus hiding the real location of the connection. You might only want to protect your location in the field rather than identity per se. For this, using the Tails operating system is the only answer.
Chapter 5: File and disk encryption
VeraCrypt
VeraCrypt is open source encryption software.
VeraCrypt works the same on Windows, Mac and Linux systems and the encrypted containers are cross-compatible between these systems. This allows you to work securely with other people without having to know what system they use.
VeraCrypt allows you to create an encrypted “container” that acts as a digital strongbox for files, locked by a password.
Once this box is created and filled with files it can be moved to an
external storage device such as a USB drive, or sent over the internet
to others.
Even if the file is intercepted, the strongbox will not reveal its contents to anyone who does not have the password.
Important! Do not forget your password, there is no other way to get to your data once it is encrypted. Losing you password means losing your data!
Encrypt with VeraCrypt
- Download
Download VeraCrypt from https://veracrypt.codeplex.com/
(and, if on Mac, FUSE for OS X: https://osxfuse.github.io/)) and install on your system like any other application. - Create an encrypted volume
1. To create an encrypted “volume” (like a folder) start the program and click Create Volume > Create an encrypted file container > select Standard VeraCrypt volume > select the location where the container will be stored on your computer (it can be moved later) and give the container an (innocuous) name.
2. The next screen is titled Encryption Options. The default selections are fine.
For the strongest encryption (encrypts multiple times), under Encryption Algorithm, select AES twoFish-Serpent, and under Hash Algorithm, select SHA-512.
3. The next screen is titled Volume size.
Select the size of the container (this will determine the maximum amount of data that can be put into it).
4. Set the volume password on the next screen. Make a good one and Do. Not. Forget!<
5. The next screen is titled “Format Options”. Select FAT.
Expert info: FAT is compatible with all systems but is limited in the maximum size of files it can contain (individual files cannot be larger than 4 GB). Usually this should not be a problem.
If you need to be able to store larger files and are certain that choosing something other than FAT will not create problems with the sharing of the files, you could choose one of the other options.
6. The program will now generate a random dataset to encrypt the volume.
Randomly move your mouse around for a moment, before clicking Format.
The program will now create the volume. Depending on the size, chosen encryption algorithm and speed of your computer this will take a few seconds to hours (for very large volumes).
7. Once the system is finished press Exit to return to the main program screen.
Congratulations – you have created your secure volume! - Encrypt an entire external hard drive such as a USB stick
Step 1: elect Create Volume > Create a volume within a partition/drive
Of course, you will need VeraCrypt to decrypt the USB drive, so if you are planning to decrypt on a computer on which VeraCrypt is not installed, you may wish to just create an encrypted container on the USB drive with your files, and also save VeraCrypt on the USB drive.
Then follow the instructions above. - Put the files you want to encrypt into your new encrypted volume Now the volume can be “mounted” (i.e. activated).
Select any slot or drive.
Click Select File > locate and select the volume you just made > click Mount.
Now enter the password and click OK.
The VeraCrypt container will now appear on your system as a separate drive (much like a USB drive or external hard disk), and you can put files into it in the same way you would a USB drive (go to My Computer or Finder and click and drag files into the container). Once you have put the desired files in the container, ‘close’ the container by clicking ‘Dismount’ in VeraCrypt. The container will now appear to be just a file on your computer.
Chapter 6: File sharing
OnionShare
OnionShare is an open source tool that lets you securely and anonymously (over the Tor network) share a file of any size.
OnionShare offers a secure method of file-sharing because it allows users to share files directly from computer to computer, across Tor connections, without uploading files to any third party’s server. Instead, the sender’s computer becomes the server for the purpose of the transfer.
OnionShare is easy to install and use on Windows, Mac, Ubuntu and Tails.
Installation on Ubuntu does require minimal use of the command line.
You can download OnionShare and find installation instructions here: https://onionshare.org
Using OnionShare:
To send files using OnionShare, you must have the Tor browser running in the background.
You must also use the Tor browser to download files shared via OnionShare.
The sender chooses the files they wish to share, and OnionShare makes
the files available for download via a URL, accessible via the Tor
browser.
As the recipient downloads the file, the sender can see the download progress and completion.
If you are concerned about focused surveillance and attempts to
intercept your shared files, you should be careful to share the URL with
your contact securely (for example, over encrypted OTR chat or
encrypted email) and anonymously (for example, using new anonymous
throwaway email accounts created on the Tor browser).
When the download is complete, or when the sender closes OnionShare, the
files are completely removed from the internet (unless you untick Stop sharing automatically in OnionShare, which enables the files to be downloaded multiple times).
Further instructions for use can be found here: https://github.com/micahflee/onionshare
Chapter 7: Operating systems
If your hardware is secure against automated and pre-positioned surveillance, it is vital to prevent the introduction of software that will make the system vulnerable again. Even if you are operating at low-risk levels, using the right software can help protect the security of your data and communications from automated and dragnet surveillance.
The most important software on a computer, in addition to the firmware, is the operating system. This is the software that takes control of the computer as it boots up and is the interface through which you use the computer. In short, the operating system tells the computer what to do, and how to do it. Popular operating systems include versions of Windows (e.g. XP, Vista, 8, 10), OS X (for Mac), and Linux distributions.
We now know that intelligence agencies often have access to “backdoors” in popular operating systems, which enable them to gain covert access to users’ data.
| Threats associated with operating systems: Malware, viruses Surveillance ‘backdoors’ within an operating system, accessible to the intelligence community Two key measures are important for protection against operating system threats: Use an open source operating system (for medium risk) Use Tails, an amnesic, incognito operating system (for high – top risk) |
To increase confidence that your operating system does not have
potential surveillance “backdoors” (i.e. that it cannot be abused for
surveillance purposes), it should be open source’. Open source
software is freely distributed software for which the source-code, the
very fabric of the operating system, is “open” and publicly available.
This allows independent experts to view the source code anytime, and
verify that there are no security flaws in the makeup of the operating
system. A full, ten-point definition is available at www.opensource.org/osd.
Furthermore, open source operating systems are less susceptible to
malware (malicious software, typically spyware) and viruses. This is
because they are much less frequently used than proprietary operating
systems and have a correspondingly low market share.
Open source software is also known as “free software”, not only for the
freedom of access to its source code, but because it is also distributed
on a free/donations-only basis.
It should be noted that open source software is only as trustworthy as
the trust one puts in the expertise and frequency with which the source
code is created and examined. However, open source software that is
widely used is more likely to be frequently examined, and is preferable
(at least for InfoSec purposes) to closed source software.
Operating systems by Microsoft and Apple (e.g. Windows, OS X) are closed source, and are expected to contain surveillance backdoors accessible to GCHQ, the NSA and allied interests. Microsoft’s operating systems are particularly unsuitable, since more of its code is closed source than Apple’s code, and their systems are more susceptible to malware and viruses. Such closed source operating systems are unsuitable for important data and communications if you think you, or someone you are communicating with, could be (or become) a target of surveillance.
Linux
Linux is the leading open source, community developed, operating system. There are many different versions of Linux operating systems that you can use: Ubuntu, Debian, Fedora, Arch, etc.
Tails
Use an amnesic, incognito operating system for the greatest security: Tails. Tails stands for “The Amnesic Incognito Live System”.
It is an open source, Linux-based operating system that protects users’ privacy and anonymity.
Amnesic: because no trace of your computer use is left on the system after shut down
Incognito: because it is privacy and security orientated,
accessing internet anonymously by default, and thus circumventing any
censorship
Tails is purposefully designed as an anti-surveillance system, and comes with several built-in (entirely open source) security-oriented applications:
- Built-in online anonymity
Once connected to the internet, various software on our computers frequently send and receive packets of data via the internet, whether in active use or not. We know that intelligence agencies routinely surveil this network activity and are working to increase this surveillance. However, all software on Tails is configured to connect to the internet anonymously, via Tor, thus protecting you from network surveillance.
Furthermore, the in-built Tor web browser includes popular security extensions like HTTPS Encryption and HTTPS Everywhere which encrypt your browsing data; Adblock Plus to block ads and tracking; and NoScript to block harmful JavaScript and Flash (as they can compromise anonymity).
Using Tails on its high security settings can mean some web features won’t work, but it is a worthwhile compromise for an incomparable privacy gain when working on sensitive projects. Alternatively, you can lower the security settings (in Tor’s security slider) or use the “Unsafe Browser” on Tails.
Note: if you use the unsafe browser, or attempt to log in to an online account that is clearly linked to your real identity on any browser, you will compromise your anonymity for that entire Tails session. Shutdown and restart Tails every time you use a new identity. Files and documents can also contain metadata that may indicate your location via GPS. - Built-in encrypted email and chat
Tails offers in-built encrypted and private messaging. Tails includes the Icedove (Thunderbird) email client with OpenPGP for email encryption and the instant messaging client Pidgin which supports private and anonymous messaging. - Built-in file encryption
Tails comes with LUKS, to encrypt files. If you want to store files on the same USB stick you are running Tails from, you can create permanent storage space, or a ‘persistent volume’ on the USB stick.
Tails will encrypt the persistent volume by default, requesting your password to view or access any of the files stored.
Expert info: Whilst the persistent volume is useful for storing relatively unimportant information and documents, you should not use it to store or transport the most sensitive documents. This is because the persistent volume is not “hidden”. That is, should an adversary obtain the USB stick, they will be able to see that an encrypted volume exists on the device, and they may force or trick you into giving them the password. - Built in password protection
Tails comes preloaded with KeePassX, a password manager that stores usernames and passwords in an encrypted, local database, protected by your master password.
It also comes with PWGen, a strong random password generator.
Tails is designed for use from a USB stick independently of the computer’s original operating system. This means that you can remove your laptop’s hard disk drive (recommended for high-risk work), but still boot up the laptop through a Tails USB stick. Alternatively, you can put a Tails USB stick into a computer with the hard disk drive intact, and boot up via Tails: the machine will ignore the original hard disk and operating system, and run from the USB drive with Tails instead.
The provision of a ‘mini system’ on a Tails USB stick makes it ideal
for sensitive journalistic projects. Your machine can essentially be
“clean” with no trace of your work on there, and your documents can be
stored on the highly portable, inexpensive USB stick.
Tails even comes preloaded with open source editing software such
as LibreOffice for creating, reading and editing documents, PiTiVifor
editing videos, and Audacity for editing sound.
It is wise to have separate Tails USB sticks for separate projects, to
spread your identity trace and minimise the risk, should you lose a USB
stick.
If appropriate, you could also give a prepared Tails USB stick to your
source, with a few instructions, so they have secure means of
communicating with you.
In high risk scenarios, you may wish to use Tails on an entirely separate machine to your usual laptop.
Using Tails
|
Booting from USB
You need to set your machine to boot from USB – a setting that is located in the BIOS menu of your laptop. You can access the BIOS menu as your machine powers up. Before attempting this, you may wish to search online to find out which key to press to access the BIOS menu on your particular laptop. On many machines an entering setup message appears as it powers up, informing you that you can press [key] to enter BIOS/setup/system configuration, in which case you can follow that instruction. It is often a key such as f1, F2, F3, F12 or DEL. You may also wish to research how, via your particular machine’s BIOS menu, to boot the machine from the USB drive. Insert the USB stick into the laptop whilst switched off, then boot up and enter the BIOS menu. This setting may be in a menu item such as Startup > Boot; or a menu tab such as Boot, Boot options, or Boot selection menu. Select your USB drive, or make sure your USB drive is top of any boot priority order (if an item on the list has a + it means it has a submenu, where your USB listing may be hiding!). You can often change the order using + and – keys. Navigate to the Exit or Save and exit menu, and select Exit saving changes (or similar) option to make sure your boot preference has been saved. So: power up the laptop with the USB stick already inserted, enter the BIOS menu, and opt to boot from your USB drive. |
When you boot up in Tails, you will see a screen load up with options Live and Live failsafe.
Use the arrow keys to highlight Live and hit the enter key.
You will then be offered, More options?. It is not essential that you enter this menu, unless you need to configure Tails to circumvent Tor censorship.
Otherwise you can select no, ‘Login’, and start exploring Tails.
If you do select yes for more options, you will see:
- Administrative password. It is unlikely you would need to create one unless you want to access the internal hard disk of the computer (which is not recommended, and can lead to unnecessary security risks).
- Spoof all MAC addresses, which should be automatically selected. This is a good option to hide the serial numbers of your network cards, and thus is another function that helps to hide your location.
- Network configuration, under which you have two options: connect directly to the Tor network, or This computer’s internet connection is censored, filtered or proxied. You need to configure bridge, firewall or proxy settings. If your network does not allow Tor connections, select the latter.
- Disable all networking if you wish to have offline use
Using Tails via bridges/circumventing censorship
This helps people to connect to the Tor network in situations where their network disallows Tor connections. Bridges are Tor relays (nodes or computer points that receive traffic on the Tor network and pass it along) that help circumvent censorship.
When you boot up using the Tails USB stick and are offered More options?,select Yes and continue.
Under Network configuration, select This computer’s internet connection is censored, filtered of proxied. You need to configure bridge, firewall or proxy settings.
Then, when you connect to the internet the Tor browser bundle window will appear asking the same question.
If the latter option applies, click Configure. You’ll be asked if your ISP blocks / censors connections to the Tor network. If you need to configure bridges, select yes here and press next.
You now have a box to enter one or more bridges: strings of numbers that identify a Tor relay. To get bridges, go to https://bridges.torproject.org or if you cannot access that site, send an email to bridges@torproject.org from a gmail.com or yahoo.com email address, with the line get bridges by itself in the body of the message, and some should be sent back to you. Using a bridge can be an extremely slow way of connecting to the internet, but if you need it to circumvent censorship, it works very well.
Creating a persistent volume in Tails
Creating persistent storage space on your Tails USB stick.
To create a persistent volume in Tails, go to Applications > Tails > Configure persistent volume.
Once you have entered a (very strong) password, you can choose what
types of files you will save in the persistent volume. You could select
all types, to keep your options open.
Now, every time you boot up with the Tails USB stick, you will be asked two questions: Use persistence?’ and More options? (as before). If you click Yes to
use persistence and enter the password, you can access any data
(e.g. configured email client, IM client, password manager, or files)
you have saved to the persistent volume in previous sessions.
OpenPGP encryption applet
Because all internet connections on Tails run through the Tor
network, connections to your email provider via your email client will
also be run through Tor. Users of some email providers sometimes have
problems configuring their email accounts with Icedove through Tails,
because the connection is re-routed through the Tor network to disguise
your location.
Tails offers an alternative method you can use to encrypt email and email attachments.
Rather than using an email client to encrypt the entire email, you can highlight text and encrypt it to the desired recipient’s key, before pasting the encrypted text into an email (e.g. when composing email on the web browser).
- Import contact’s public key
Go to the OpenPGP encryption applet (the clipboard icon in the top right of the top menu toolbar) > Manage keys > then either Remote > Find remote keys (if you do not already have the person’s key). Enter the contact’s name, and click search.
Or
File > Import (if you have the key already saved in a file). - Encrypt the text
Applications (left on the top menu toolbar) > Accessories > gedit Text Editor.
Type your message. Then select all (Ctrl + A) and copy (Ctrl + C, or right click > copy) the message to the clipboard.
Go to the OpenPGP encryption applet > Sign/encrypt Clipboard with Public Keys > select the recipient of your email (you need to have already imported their key), sign the message as the email address from which you will be sending the email, and click OK.
Then paste the message (Ctrl + V) into the composing window in your email account, and send.
Note that you have encrypted the message to only allow decryption by the desired recipient. This means that once encrypted, you cannot decrypt it to read it yourself. Therefore, if you use this method, it is a good idea to select your own public key, as well as that of the recipient of the email, when you encrypt the message. You will then be able to decrypt it if you want to read your sent messages. - Decrypt the text
Select the encrypted text that you want to decrypt. Include the lines —–BEGIN PGP MESSAGE—– and —–END PGP MESSAGE—–.
Copy the text to the clipboard (Ctrl + C, or right click > copy).
The OpenPGP Applet (clipboard icon) now shows a padlock, meaning that it contains encrypted text. If the text that you selected is only signed but not encrypted, the OpenPGP Applet now shows a seal, meaning that the clipboard contains signed text.
Click on the OpenPGP Applet (clipboard icon) and select Decrypt/Verify Clipboard from the menu. The decrypted text appears in the Output of GnuPG text box. - Encrypting email attachments
It is easy to encrypt files using public keys and to send these as email attachments with Tails.
Right click the desired file > Encrypt > tick the recipient’s email address (sign the message as the address from which you will send the email) > OK.
You will now see a duplicate of the selected file, with the .pgp extension: this means it is an encrypted file.
Attach the .pgp file to your email,which can only be decrypted and opened by your chosen recipient.
Upgrading Tails
Your Tails system should automatically look for, and download, updates. It is important to keep your system updated.
After booting Tails and connecting to Tor, if an upgrade is available, a
dialog box appears and proposes you to upgrade the system.
However, it can often take a while for Tails to connect to the
internet after booting, in which case it may be unable to check for
upgrades at start up.
You can check for upgrades anytime by opening the Terminal (black box
icon on the top toolbar on the Tails desktop) and typing the following
command:
tails-upgrade-frontend-wrapper
And press enter. Tails will check for updates, or inform you whether your system is up to date.
More information on upgrading Tails, and troubleshooting when Tails
does not upgrade automatically, can be found on the Tails website:
https://tails.boum.org/doc/first_steps/upgrade/index.en.html
Chapter 8: Ressources
If you need more training
Learn more about Information Security in CIJ’s Information Security for Journalists handbook by Arjen Kamphuis and Silkie Carlo, on which this tutorial is based.
http://tcij.org/resources/handbooks/infosec/
Reach out to organizations that help journalists and/or activists:
- The Centre for Inverstigative Journalism organizes trainings on a regular basis and can provide help to journalists in need: http://tcij.org/.
- The Tactical Technologie Collective specializes (among others) in trainings and infosec resources for activists that can be very useful for journalists: https://tacticaltech.org/.
- For hands-on training, you can attend a CryptoParty: https://www.cryptoparty.in/.
Be careful, CryptoParty is an open movement based on volunteer training: while some CryptoParties can be very helpful, not every CryptoParty offers good quality training!
To read
How your smartphone tracks you
https://www.bof.nl/2014/07/30/how-your-innocent-smartphone-passes-on-almost-your-entire-life-to-the-secret-service/
Micah Lee’s articles about security on The Intercept
https://theintercept.com/staff/micah-lee/